

Top 10 Tips for Improving Hockey Shot Power
Table of Contents
- 1. Master Proper Shooting Mechanics and Body Rotation
- 2. Develop Leg Drive and Knee Bend for Shot Power
- 3. Perfect Your Wrist Shot Technique
- 4. Choose the Right Hockey Stick Flex and Shot Power
- 5. Build Off-Ice Hockey Shooting Exercises for Strength
- 6. Execute Hockey Shooting Drills for Consistency
- 7. Improve Balance and Body Control
- 8. Focus on Shot Accuracy Alongside Power
- Frequently Asked Questions
Last Updated: October 8, 2026
1. Master Proper Shooting Mechanics and Body Rotation
The foundation of powerful hockey shot power starts with your body mechanics. Most players focus only on their arms and hands, but the real force comes from your core, hips, and legs working together in sequence.
Think of your shot like a whip. The handle (your body) generates the energy, and the tip (your stick blade) releases it.
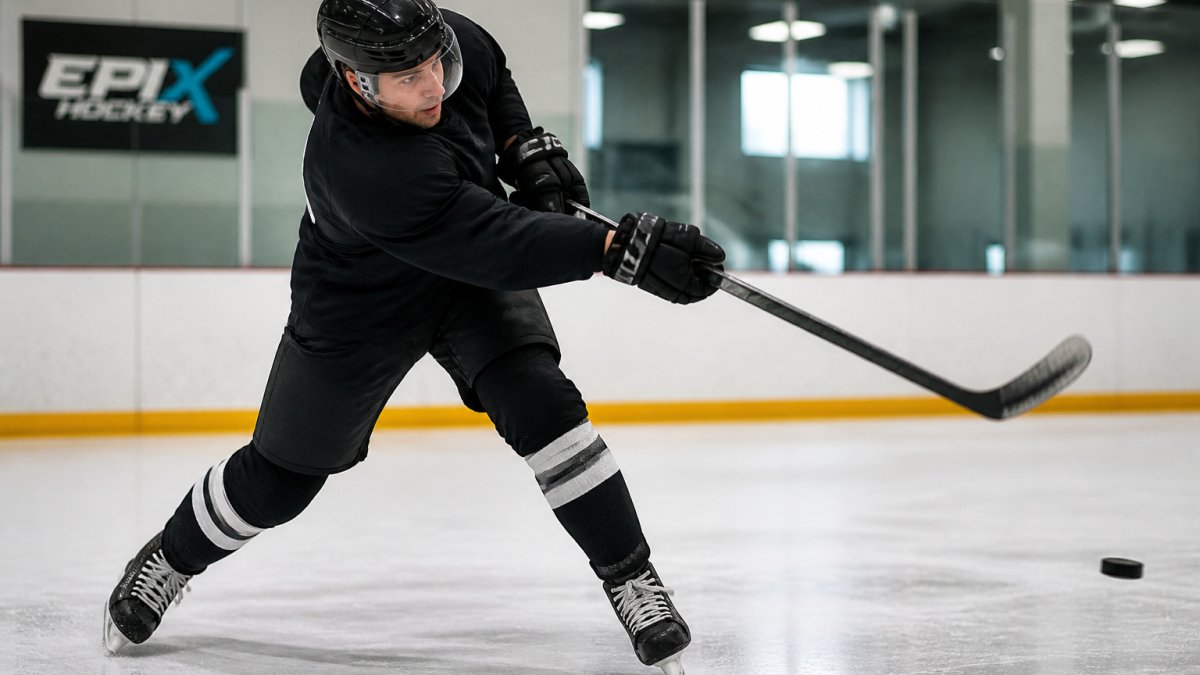
Loading the Stick and Weight Transfer
Loading the stick means bending it to store energy before release. Start by positioning your weight on your back leg as you bring the puck behind your body. Your stick blade should flex slightly as you prepare; this is the "load." The more flex you create, the more energy your stick stores and releases.
Weight transfer is critical. As you begin your shot, shift your weight from your back foot to your front foot in one smooth motion. This forward momentum drives through your hips and into the stick. Players who rush this step or transfer weight unevenly lose power and consistency. Your front shoulder should lead the rotation, pulling your hips through naturally.
Follow-Through and Release Point
Your release point determines accuracy and power. The puck should leave your stick blade at the right moment in your swing; too early and you lose power, too late and the shot goes wild. Most players release around the middle of their stance, slightly forward of their body centerline.
Follow-through matters more than most guides admit. After releasing the puck, your stick should continue moving toward your target. A complete follow-through means your stick finishes high, pointing at where you want the puck to go. This isn't just for show; it ensures you've transferred all your energy into the shot and helps with accuracy.
2. Develop Leg Drive and Knee Bend for Shot Power
Your legs are your power source. Hockey shot power comes primarily from the ground up, not from your upper body. Players with weak leg drive compensate by using only their arms and shoulders, which limits shot power and creates inconsistency.
Knee bend is the starting position for everything. Before you even load your stick, your knees should be slightly bent, not a deep squat, but enough that you have room to push down and forward.
Many recreational players skip leg work off the ice, then wonder why their shot power plateaus. Squats, lunges, and single-leg work build the explosiveness you need.
3. Perfect Your Wrist Shot Technique
The wrist shot is the most common shot in hockey, and also the most misunderstood. It's not a flick of your wrists; it's a controlled snap that combines body rotation, weight transfer, and a quick release all in one motion. The "wrist" part comes last, not first.
Start your wrist shot the same way you'd start a slap shot: load your weight on your back leg, rotate your hips and shoulders, and flex your stick. The difference is the wrist shot happens faster and with less backswing. Your stick loads lower on the shaft, closer to the blade.
Hand Separation and Puck Position
Hand separation is the distance between your top hand and bottom hand on the stick. Wider separation gives you more use and power. Most players separate their hands by 12 to 16 inches; find what feels natural for your body size and strength.
Puck position matters enormously. The puck should be positioned slightly ahead of your body, not directly under you. If the puck is too far back, you can't load the stick properly. If it's too far forward, you lose power and accuracy. Practice finding the sweet spot by shooting at targets from different angles and distances.
Quick Release and Snap Mechanics
A quick release comes from practice and muscle memory, not from moving faster. The snap happens when your bottom hand pulls the stick toward your body while your top hand pushes away; this creates the flex and snap that generates power. It's a small, explosive motion that takes milliseconds.
The best way to develop snap is through repetition. Shoot the same way hundreds of times until your body knows the motion without thinking. Catch-and-shoot drills are perfect for this; they force you to release quickly without time to overthink your mechanics.
4. Choose the Right Hockey Stick Flex and Shot Power
Stick flex is the stiffness of your stick shaft. Flex is measured in pounds of force required to bend the stick one inch.
Choosing the right flex is personal and depends on your weight, strength, and shooting style. Lighter players benefit from lower flex (60-70) because they can load the stick more easily.
The kick point, where the stick loads and releases, also affects your shot power. A low kick point loads near the blade and releases quickly, perfect for snap shots and one-timers.
At Epix Hockey, we engineer sticks with proprietary kick point technologies like Neo-Mid, LightSpeed Low, and Synth Hybrid to match different playing styles.
5. Build Off-Ice Hockey Shooting Exercises for Strength
Off-ice training directly translates to on-ice power. The strongest, fastest shooters in the game spend as much time in the gym as they do on the ice. Off-ice work builds the muscle endurance and explosive power that make your shot lethal.
Core and Upper-Body Strength Work
Your core is the bridge between your legs and your stick. Core strength stabilizes your body during the shot and allows efficient energy transfer. Planks, dead bugs, pallof presses, and rotational exercises all build core power. Aim for 2-3 core sessions per week, 15-20 minutes each.
Upper-body strength focuses on your shoulders, chest, and back. Rows, push-ups, shoulder presses, and pull-ups build the muscles that control your stick and follow through. Don't neglect your back; strong back muscles stabilize your shoulders and prevent injury.
Lower-Body Power Development
Squats and lunges are non-negotiable for shot power. Barbell back squats build overall leg strength. Bulgarian split squats and single-leg work build stability and prevent imbalances. Plyometric work, box jumps, jump squats, bounding, builds the explosive power that translates directly to leg drive on the ice.
Aim for 2-3 lower-body sessions per week. Include both strength work (heavy weight, low reps) and power work (lighter weight, explosive movement). Your legs should feel strong and stable on the ice, not fatigued.
6. Execute Hockey Shooting Drills for Consistency
Repetition is the only way to build consistency. Professional players shoot hundreds of pucks per week in practice. You need volume to develop muscle memory and confidence in your shot.
Repetition and Target Practice
Set up targets in your practice area: cones, tape marks on the boards, or designated areas in the net. Shoot at these targets from different distances and angles. Start close (3 to 5 meters) and gradually move back. The goal is to hit your target consistently, not to shoot as hard as possible.
Track your accuracy. How many shots out of 10 hit your target from 6 meters? From 9 meters? This gives you measurable progress. Most players find their accuracy improves dramatically after 50-100 repetitions from the same spot.
Game-Situation Drills
Shooting in practice is different from shooting in games. In games, you have limited time, defenders closing in, and pressure. Game-situation drills simulate these conditions.
Catch-and-shoot drills force you to release quickly. Have a teammate pass you the puck, and you shoot immediately. No time to think, just react. One-timer drills are even more demanding; you shoot the puck without stopping it first. These drills build the instinctive release that makes you dangerous in games.
| Drill Type | Purpose | Frequency | Duration |
|---|---|---|---|
| Target practice | Accuracy and consistency | 3-4 times per week | 10-15 minutes |
| Catch-and-shoot | Quick release development | 2-3 times per week | 8-10 minutes |
| One-timer drills | Game-speed release | 1-2 times per week | 5-8 minutes |
| Repetition volume | Muscle memory | Daily | 15-20 minutes |
7. Improve Balance and Body Control
Balance is the foundation of every shot. If you're off-balance, your body can't rotate properly, your weight transfer falls apart, and your shot power suffers.
On-ice balance comes from ankle strength, core stability, and proprioception (body awareness). Practice skating backward, stopping hard, and changing direction quickly. These movements build the stabilizer muscles that keep you upright during shots.
Off the ice, single-leg work improves balance dramatically. Single-leg squats, single-leg deadlifts, and balance board work all build stability.
Body control means knowing where your body is in space and controlling it precisely. This comes from practice and awareness. During shooting drills, focus on your body position, not just on the puck. Are your knees bent?
8. Focus on Shot Accuracy Alongside Power
Power without accuracy is wasted effort. A 100-mph shot that misses the net is worse than a 75-mph shot that goes top shelf.
Accuracy improves through targeted practice. Set up small targets in the corners, high areas, and low areas of the net. Shoot at these targets from different distances.
Many players sacrifice accuracy for power. They wind up and shoot as hard as possible, ignoring where the puck actually goes.
The relationship between power and accuracy is simple: they're not opposites. The best shooters are accurate shooters who also happen to be powerful.
Improving your hockey shot power is a long-term project that requires focused work on mechanics, strength, and repetition.
At Epix Hockey, we understand that equipment matters too. Our sticks are engineered with aerospace-grade carbon fiber and proprietary kick point technologies like Neo-Mid, LightSpeed Low, and Synth Hybrid to help you transfer your power efficiently.
Frequently Asked Questions
How can I increase my hockey shot power?
Increasing shot power combines three elements: proper shooting mechanics with full body rotation and weight transfer, leg drive with strong knee bend, and consistent practice. Focus on loading your stick correctly, rotating your hips and shoulders together, and driving through the puck with your legs. Off-ice strength work targeting your core, upper body, and lower body amplifies these gains. Most players see measurable improvements within 4-6 weeks of focused practice on these fundamentals.
Does hockey stick flex affect shot power?
Yes. Stick flex directly impacts your shot power and release speed. A flex that matches your strength and shooting style allows you to load the stick properly and transfer energy efficiently. Too stiff a flex prevents proper loading; too soft lacks the return force needed for power. Your weight, strength level, and shooting technique should guide your flex choice. Epix sticks like the DARKMATTER feature the LightSpeed Low kick point, which loads instantly for rapid energy transfer, or the Neo-Mid profile in ICECOLD for progressive mid-shaft loading. Choosing the right flex for your body and style is as important as technique itself.
What are the best off-ice exercises for a harder hockey shot?
The most effective off-ice exercises target the muscles that generate shot power: core stability (planks, anti-rotation work), upper-body strength (chest press, rows, shoulder work), and lower-body explosiveness (squats, lunges, deadlifts). Rotational exercises that mimic the hip and shoulder turn in shooting are especially valuable. Plyometric work like medicine ball rotations and lateral bounds builds the explosive power needed for snap shots and one-timers. Consistent off-ice training 2-3 times per week compounds gains over time and reduces injury risk.
How often should I practice shooting to improve hockey shot power?
Shooting practice 3-5 times per week, combined with 2-3 off-ice strength sessions, produces the fastest gains. Quality matters more than volume: focused drills targeting wrist shots, snap shots, and one-timers deliver better results than random shooting. Track your progress by measuring shot speed or counting successful targets in drills. Most players notice tangible improvements in release speed and accuracy within 4-6 weeks when combining on-ice technique work, targeted drills, and off-ice conditioning.